Opslag

Viser opslag med etiketten tips

First thoughts on Gel Press

Billede
  Hello everyone! Before we start you may wanna go grab a cuppa. This is a longer post than usual 😉 I've always steared clear from mixed media thinking it was way too many impressions in one piece of paper, lol 😅 However lately I've found that there are ways to use layers and glitter in mixed media, so I warmed up to it. Which led to the obvious question - what exactly is mixed media? Turns out it really just describes the use of more than one medium. So in a way pretty much every card I've ever made is mixed media. Although most of us probably wouldn't put them in that category. I started watching videos of mixed media projects on YouTube. Lots of videos. There are soooo many possibilities and adding color to paper on a gel plate is only one of them. Originally they are intended for acrylic paint, but also work with regular and oxide Distress inks and alcohol ink, which I'm looking forward to try. But if you want to give gel press a try I do recommend you get you...

Stencil Techniques - Poppystamps

Billede
Hello everyone! Today I'm up on the  Poppystamps Blog  with a series of stenciling techniques. Simple stenciling with one color of ink, also using patterned paper. Ink blending for depth. Check out the labels - so romantic, don't you think? My favorite - texture paste with glitter embossing powder. L-O-V-E!!! Texture paste with watercolor powders. These shimmery colorburst powders from Nuvo are so gorgeous! And finally partial stenciling. I love that wheelbarrow and whimsical flower branch - so cute. And the glitter paper - sturdy, very glittery, cuts easily. Oh, and the Fairy Sugar - gorgeous! There are a few more details over on the  Poppystamps Blog  including product links.  Please let me know if there's a technique you'd like me to cover in the future. Thanks for stopping by, and happy crafting.

AAA Birthday challenge Game #11 Flowers

Billede
   Hello everyone! Today we are kicking off the March challenge over at  AAA Birthday challenge blog  and the theme this month is Flowers! I recently bought the Altenew Camellia Japonica Build-a-flower set. They are a series of layered flower stamps that include the die - YAY!, for lots of easy flower cards! Now, the setup can be a little time consuming, but it's so worth it! I cut a piece of cardstock in half so that it will fit inside my Misti. Then I cut the flower out 4 times, since there's 4 layers in the set. I used Neenah 80lb cardstock. Placing the cardstock piece in my Misti and backing it with a piece of printer paper, allowed me to test if the first layer was centered on the die cut piece. After getting that just right I stamped onto one of the die cut pieces. I could then move the die cut flower to the next negative space and place the 2nd stamp perfectly and so forth. Once all 4 layers are placed in the Misti you are good to go and you'll ...

Guest designer for A place to start

Billede
Hello everyone! The lovely Chana from  A place to start challenge blog  kindly asked me to guest design for them, and I'm honored and delighted to do so! The October challenge is such a fun one! Now there's a challenge that's bound to unleash your creative spark! A few weeks ago we went to the christening of our friends baby girl. I had most of the card planned in my head, and it was perfect for this challenge! So many cute images to choose from, but I went with the Whimsy stamps digital image "Baby Ellie".  So adorable holding the trunk of Mama elephant. I printed it on Neenah cardstock, colored it with Copics and die cut it with a My favorite things Dotted circle stax die. Copics used: Ellie: W5, W3, W1, W0, RV21, RV00 Bow: RV25, RV21, RV00 - After it dried I added BV000 Other: RV21, RV00, C1 For the card itself I used the Dutch Doobadoo Card art Baby onesie. It's not a die, but a stencil. It lets you line out both the onesie base (a tri-fol...

Dream big!

Billede
Hello everyone! Today I'm sharing a magical purple fairy card using lots of stencils with different techniques and this cute The Greeting Farm 10-year anniversary freebie digital stamp. I printed on Neenah cardstock, colored with my copics and fuzzycut it out. Copics used: Skin: E04, E11, E00, E000, RV02 Hair: RV52, RV55, RV66, RV69 Wings: RV52 Eyes: RV55 Outfit: V12, V15 Stars: C5, C3, C1 On a panel of light lavendar cardstock I first used the My favorite things Captivating mandala stencil with WOW! embossing ink and WOW! Royal Crush embossing powder. After heat setting I used the Altenew Classy stripes stencil with Wilted violet oxide ink. I didn't color all the way accross for an ombre look. With the Create a smile Wave of stars stencil I first used Ranger glossy transluscent texture paste with WOW! Purple glitz embossing powder. After heat setting i used one of the "rays" of starts on that same stencil with Ranger...

Birthday card for my princess

Billede
Hi everyone, Today is my big girl's 6th birthday. She had her first day of school ever this last Monday. I can't belive how big and independent she is already. For her birthday card she asked for a unicorn. So the search was on for a perfect unicorn to fit on an infinity shaker card. I chose the Whimsy Stamps Mystic. That big curly mane spoke to me. Although rainbow would've been the obvious color choice - 'cause unicorn and it's my daughter's favorite - I chose another favorite of hers, purple. Mostly because I don't have rainbow sequins lol. I stamped on Neenah cardstock, colored with Copics and fuzzy cut it out. Who would've thought Copic V's and BV's work so well together! The horse anatomy is not too well known for me, although I do love horses. But I took inspiration from the shading on the packing for the stamp. And of course I had to shimmer it up with my Spectrum noir Clear sparkle pen. To create the panel for t...

Another pink snowdrift

Billede
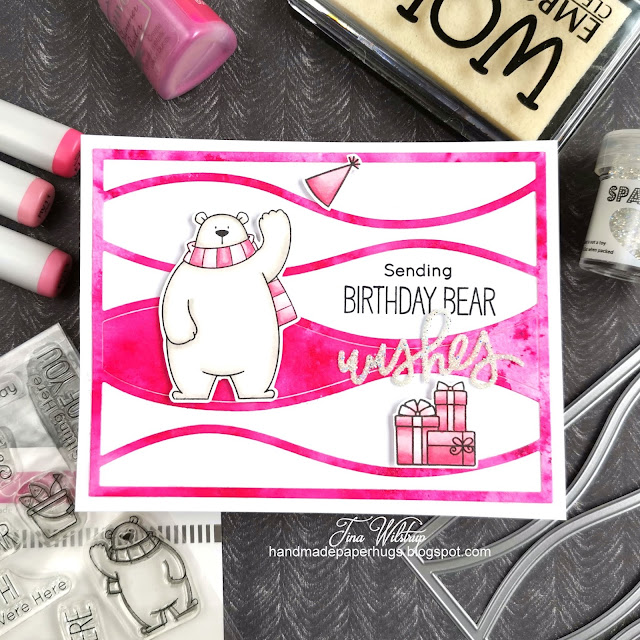
Hello! I had a couple of peaces left from the pink snowdrift card a few days ago, so I decided to use these on another card. I adhered the My favorite things Horizontal snowdrift frame covered in Nuvo shimmer powder on a panel of white cardstock. There was one pink snow drift left, and I used this as well. I stamped, Copic colored and fuzzy cut another bear from the MFT Polar bear pals set, as well as the party hat and presents from the MFT Beary special birthday set. I popped them up with foam squares. Copics used: W3, W1, colorless blender, RV14, RV13, RV21, RV00 I stamped parts of a sentiment from the Beary special birthday set. Then I added double sided tape to a piece of white cardstock and cut the "wishes" from the MFT. I peeled off the backing and covered the cut out with WOW! Bridal sparkles.  Tip: The WOW! Sparkles are not embossing powders, but amazing, sparkling glitter. Adhere it with double sided tape, bonding powder, or mix with ...

MFT sketch #444

Billede
Hello! OK, so snow drifts can be pink, right? Right! I created this background using watercolor cardstock, Nuvo shimmer powder in Cherry bomb and my water spritzer. I added a couple of layers of the powder for more intense color and also because all the little specks got washed out. And they honestly are the reason I love this powder and why I think it's so unique. I know your supposed to dilute it all for an even layer, but I like it this way. I used the MFT Horizontal snow drifts die to cut the panel.  It's so hard to get the shimmer on photos, but it's so shiny in real life. TIP: I sandwiched a piece of parchment paper between the cardstock and die to prevent the shimmer powder from sticking to my die and potentially ruining a future project. Ask me how I know I need to do this. I stamped 3 images from MFT Polar bear pals, colored them with my copics and fuzzy cut them out. I cut the frame die from white cardstock as well and placed i...