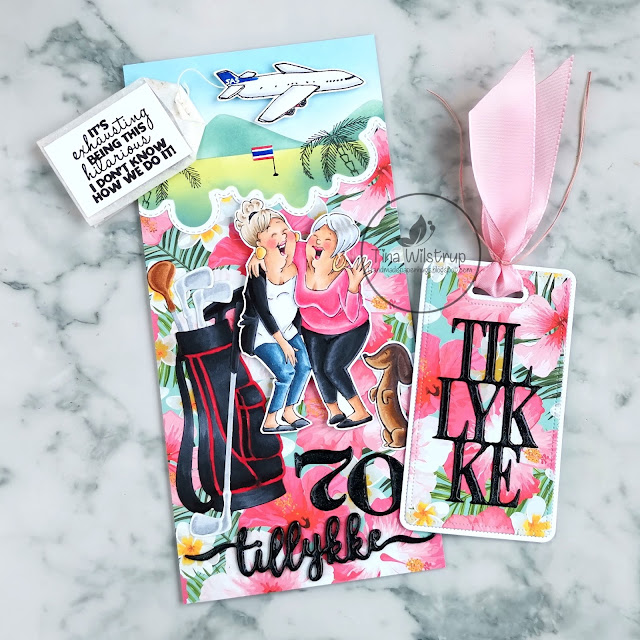
Opslag

Viser opslag med etiketten distress ink

Girly overload...

Billede
 A very girly card, and my first side-step card. I struggled a bit with the layout, but I'm really happy with the result.  The girl is from Make it Crafty, which has sadly closed.  All make-up, ring/diamonds and shoes are from Three Scoops Nail polish and perfumes are from NHH Small text sentiment from Gavlhuset Brush Tillykke die from Gitte's eget design 18 numbers from Mama Elephant  Numbers and die cut word cut from Nuvo mirror card.  The "paper" is ink smooshed paper using Victorian velvet and Spun sugar Distress inks.

You are special

Billede
Hey friends! I'm sharing another set of cards for the Danish Operation write home. For the cards created during the last couple of months can be said that they're NOT birthday cards but love and support cards. Sincd I usually mostly create birthday cards it's nice to do something else for a change. Products used: The Greeting Farm Magical friends Copic markers Create a smile stamps Du die Gitte's eget design Mix & match - Du Couture Creations - tied together embossing folder Tim Holtz Distress inks Hero Arts white embossing powder Recollections silver sequins I really love this embossing folder and I really should use it more. I actually ran the folded cardbase through my Big Shot so you can see the debossing on the inside of the card.  For this card I used Shaded lilac Distress ink. Copic markers: RV09, RV06, RV02, RV00 BV04, BV13, BV02, BV01 Same ink, same BV markers and W5, W3, W1, W0, RV02 Fun fact! The Create a smile "du" word means you in both German...

Secret santa monochromatic Christmas

Billede
  I know Christmas is long over, but I still have Christmas cards to share. Hope you don't mind. So I couldn't send off Christmas cards for the Danish operation write home without using my favorite set - My favorite things Secret santa. I kept them really simple, and honestly my starting point was using just one marker for everything colored. But then I changed my mind and I did use a little more. I used pinks for the girl cards and reds for the boys cards. The Simple and Basic Julekram (Christmas hug) die is died with Distress ink smooshing.  And the matte? Totally cheating there and added a thin line with a Copic marker. Thanks for stopping by! Let me know in the comments what your favorite Christmas stamp set/die is. Stay safe, and happy crafting! Tina

70th birthday

Billede
  Hey everyone! Today I'm sharing a custom made birthday card for a friend of the family. Meaning my Mom asked me to make it for someone I've known most of my life. So I wanted it to be special. The recipient is a joker, it's always fun to be around her. My Mom asked me to include that  - she plays golf  - has a wiener (dachshund)  - has worked for SAS (the airline) for a lifetime and  - "plumeria, the flag of Thailand or something else Thai" since she's married to a Thai (a prince none th eless) and travels there a lot. Oh, and by the way, if you think the tag looks familiar that's because the tag was in my post for AAA Birthday card for september, which is still running, so check that out HERE . So these happy ladies are from the Art Impressions Girlfriends series, the Laughing set. I love them! And it was absolutely perfect for this card! I totally picture my Mom and her friend like this rolling over with laughter. I can almost hear them, lol! The wiene...

It's penguining to look a lot like Christmas...

Billede
  Hi guys! Although Christmas seems far away it's never too soon to begin getting those cards done. Especially when they must travel around the world twice - to far away places in war zones and back home to families. In fact, believe it or not, we just about reached the deadline for the Danish Operation Skriv Hjem (operation write home) Christmas cards. The stamps are from My favorite things Holiday penguin and I colored the penguins with Copics. I ink blended the backgrounds with Distress ink (on the left) and Distress Oxide inks (on the right). For both I used Tumbled glass and Blueprint sketch. Before adding the penguins I white heat embossed the tree and a sentiment from the set. The "snow" was created by splotching a bit of water on the panels and then adding embossing powder. Yes, that actually works! The red baubles are cut from glitter cardstock. The cheap kind that only slightly sparkles, since we can't take any chances with glitter. I used the "berry...

Friends of Rachel Vass IG hop

Billede
  Hello everyone! Today we are celebrating our friendship with Rachel Vass. Rachel is a very talented artist and a wonderful human being. A bunch of crafters joined forces to share lots of amazing inspiration using Rachel's gorgeous digital stamps. Check them out in her Etsy store here ! Hop on over to my instagram to join the IG hop with some amazing prizes to be won and of course to check out all the inspiration 😉 Initially I was going to make an anniversary card with those cute bunnies from the Hugs set but then decided I needed a card for a friend. I created the 2 flower borders by layering 4 different elements from the Special to me set . And yes, you guessed it. I Copic colored them using these markers: RV25, RV13, RV10 G05, G02, YG11 E30, E31, E33, E34, E35 W3, W1, W0 I used an oval frame from Nellie Snellen to cut an opening in my cardbase and adhered the fuzzy cut flower borders at the edge. On the inside of the card I ink blended a bit of Tumbled glass and Mermaid lago...

18th Birthday masculine card

Billede
  Hello everyone! I'm sharing a custom made card for a young man celebrating his 18th birthday. Key words: hot babe. In Denmark we are generally more tolerant with this kind of thing. It's often joked with and not looked down upon. I figured he'd probably be into card as well, so I stamped and black heat embossed the cars from Honey Bee stamps Car show onto watercolor paper. Then I used a clear embossing paste through a new Gummiapan stencil No.3. I really like that one. Next I applied Tumbled glass and Faded jeans Distress ink re-inker directly to the top of the paper and sprayed liberally with my Distress water spray. I dried it in between layers and repeated the process with the bottom of the card. I also sprayed with Speckled egg and Spiced marmelade Oxide sprays. The hot babe is a Kenny K digital stamp. Sorry to get your hopes up, because they sadly closed years ago. As always I colored with Copics: Skin: E15, E13, E21, E11, E00 + R32 Eyes: B24 Lips: R22, R29 Hair: E51...

AAA Birthday challenge - game #24 Shaped card

Billede
  Happy Easter Monday friends! I hope your Easter offered lots of fun, family, relaxing, crafting or whatever you wished for.  Today we're kicking off the April challenge over at AAA Birthday blog and the theme this month is Shaped card. I recently (well some time last year) purchased these cute Whimsy stamps Hap-Bee birthday bees. I think they're so fun! I felt they would be the perfect feature for a hexagon-shaped card, so I stamped the bees and copic colored them. Copics used: Yellow: YR24, YR23, Y17, Y21, Y11  Black: E47, E44, E40 Wings: E55, E53, E50 Mouth: E99, E97, R85, R83 Orange: YR68, YR04, YR82 Teal: BG49, BG15, BG23 I thought it would be fun to also make it an easel card, so I used the largest die in the Waffle Flower Nesting hexagon set to cut these 2 pieces out.  To cut the one on the left I folded a piece of cardstock and placed the edge of the die juuuust outside the paper, so it would cut the whole shape and leave the fold.  Next I folded one h...

Alex Syberia Design March release

Billede
  *reklame* Hello everyone! There's a new release available at Alex Syberia Design Etsy shop  and today I'm sharing a couple of cards to inspire you. I encourage you to check out the whole release because it is gorgeous! My first card features a couple of lowey dowey flamingos in spring colors, because I'm soooo ready for spring! To make one of the flamingos more feminine I also printed the Springtime flower image. I printed it very small and fuzzy cut it, cutting part of it off so it would fit on top of the flamingo's head. I'll be honest, it was a tricky one to cut 😉 I know, flamingos aren't normally pink but rather a more subdued coral. But "normal" went missing so I colored them pink! Copic colors used: RV25, RV13, RV11, RV10 + C9, C7 Y28, YR21, YR20, YR000 YG06, YG03, YG01 Using the Simple and Basic Slim Card dies I placed the flamingos on a panel cut from bronze glitter cardstock before adhering to the base which I'd blended with a bit of Sp...